git の状態(ブランチ名、未追跡ファイルなど)を bash プロンプトに表示する方法
- 前提
- 設定方法
- 表示例
- 共通 (特定の環境変数に依存しない)
- GIT_PS1_SHOWUNTRACKEDFILES=true:未追跡ファイル (%)
- GIT_PS1_SHOWDIRTYSTATE=true:ステージ(+), 未ステージ(*)
- GIT_PS1_SHOWSTASHSTATE=true:スタッシュ ($)
- GIT_PS1_SHOWUPSTREA=<value>:アップストリームとの差分状態
- GIT_PS1_STATESEPARATOR=<value>:区切り文字
- GIT_PS1_*SPARSESTATE=true:sparse-checkout 関連
- GIT_PS1_DESCRIBE_STYLE=<value>:特定タグ、コミット、ブランチをチェックアウトした時の表示
- GIT_PS1_SHOWCOLORHINTS=true:色付きで表示
- 参考
前提
表示例では、リモートの git リポジトリを clone したディレクトリが存在することを前提とします。
補足:環境情報
# uname -r
5.12.9-300.fc34.x86_64

# cat /etc/fedora-release
Fedora release 34 (Thirty Four)

# git --version
git version 2.31.1

# bash --version
GNU bash, version 5.1.0(1)-release (x86_64-redhat-linux-gnu)
Copyright (C) 2020 Free Software Foundation, Inc.
License GPLv3+: GNU GPL version 3 or later <http://gnu.org/licenses/gpl.html>

This is free software; you are free to change and redistribute it.
There is NO WARRANTY, to the extent permitted by law.
設定方法
~/.bashrc などに次の内容を設定し、source ~/.bashrc などで設定を読み込む。環境変数は適宜コメントアウトする想定で、各環境変数に対応した機能の説明は後述する。
なお、git-prompt.sh は git の公式で用意されているスクリプトで、私の環境では (おそらく) git インストール時に上記パスに配置されていた。環境にっては配置パスが異なる可能性があるので注意。スクリプトが存在しない場合は git/git-prompt.sh at v2.31.1 · git/git · GitHub から当該スクリプトを取得してくる必要がある。
if [ -f "/usr/share/git-core/contrib/completion/git-prompt.sh" ]; then
        . /usr/share/git-core/contrib/completion/git-prompt.sh

        # プロンプト表示フォーマット
        PS1='[\u@\h \W$(__git_ps1 " (%s)")]\$ '

        # 未追跡ファイル (%)
        #GIT_PS1_SHOWUNTRACKEDFILES=true

        # ステージ(+), 未ステージ(*)
        #GIT_PS1_SHOWDIRTYSTATE=true

        # スタッシュ ($)
        #GIT_PS1_SHOWSTASHSTATE=true

        # アップストリームとの差分状態
        #GIT_PS1_SHOWUPSTREAM="auto"

        # 区切り文字
        #GIT_PS1_STATESEPARATOR=':'

        # sparse-checkout 関連
        #GIT_PS1_OMITSPARSESTATE=true
        #GIT_PS1_COMPRESSSPARSESTATE=true

        # 特定タグ、コミット、ブランチをチェックアウトした時の表示
        #GIT_PS1_DESCRIBE_STYLE=branch

        # 色付きで表示
        #GIT_PS1_SHOWCOLORHINTS=true
        #PROMPT_COMMAND='__git_ps1 "\u@\h:\w" "\\\$ "'
fi
上記設定については、git-prompt.sh のコメント(公式の設定方法)を参考にしている。スクリプト内には、各環境変数についての説明もあるが、これについては各環境変数の個所で記載する。
上記設定方法の説明個所
#    1) Copy this file to somewhere (e.g. ~/.git-prompt.sh).
#    2) Add the following line to your .bashrc/.zshrc:
#        source ~/.git-prompt.sh
#    3a) Change your PS1 to call __git_ps1 as
#        command-substitution:
#        Bash: PS1='[\u@\h \W$(__git_ps1 " (%s)")]\$ '
#        ZSH:  setopt PROMPT_SUBST ; PS1='[%n@%m %c$(__git_ps1 " (%s)")]\$ '
#        the optional argument will be used as format string.
#    3b) Alternatively, for a slightly faster prompt, __git_ps1 can
#        be used for PROMPT_COMMAND in Bash or for precmd() in Zsh
#        with two parameters, <pre> and <post>, which are strings
#        you would put in $PS1 before and after the status string
#        generated by the git-prompt machinery.  e.g.
#        Bash: PROMPT_COMMAND='__git_ps1 "\u@\h:\w" "\\\$ "'
#          will show username, at-sign, host, colon, cwd, then
#          various status string, followed by dollar and SP, as
#          your prompt.
#        ZSH:  precmd () { __git_ps1 "%n" ":%~$ " "|%s" }
#          will show username, pipe, then various status string,
#          followed by colon, cwd, dollar and SP, as your prompt.
#        Optionally, you can supply a third argument with a printf
#        format string to finetune the output of the branch status
表示例
設定前のプロンプトは次のとおり。
[root@localhost sandbox]#
共通 (特定の環境変数に依存しない)
ブランチ名
[root@localhost sandbox(main)]#
特定の操作時
merge, rebase, revert, cherry-pick, bisect 実行中は、 |<OPERATION-NAME> と表示される。
例) bisect
[root@localhost sandbox (main)]# git bisect start
[root@localhost sandbox (main|BISECTING)]#
上記の説明個所
# When there is an in-progress operation such as a merge, rebase,
# revert, cherry-pick, or bisect, the prompt will include information
# related to the operation, often in the form "|<OPERATION-NAME>".
GIT_PS1_SHOWUNTRACKEDFILES=true:未追跡ファイル (%)
[root@localhost sandbox(main)]# touch file
[root@localhost sandbox(main %)]#
上記環境変数の説明個所
# If you would like to see if there're untracked files, then you can set
# GIT_PS1_SHOWUNTRACKEDFILES to a nonempty value. If there're untracked
# files, then a '%' will be shown next to the branch name.  You can
# configure this per-repository with the bash.showUntrackedFiles
# variable, which defaults to true once GIT_PS1_SHOWUNTRACKEDFILES is
# enabled.
GIT_PS1_SHOWDIRTYSTATE=true:ステージ(+), 未ステージ(*)
ステージ (+)
[root@localhost sandbox(main)]# touch file
[root@localhost sandbox(main)]# git add file
[root@localhost sandbox(main +)]#
未ステージ (*)
[root@localhost sandbox(main +)]# git commit -m "test"
[root@localhost sandbox(main)]# echo test > file
[root@localhost sandbox(main *)]#
上記環境変数の説明個所
# In addition, if you set GIT_PS1_SHOWDIRTYSTATE to a nonempty value,
# unstaged (*) and staged (+) changes will be shown next to the branch
# name.  You can configure this per-repository with the
# bash.showDirtyState variable, which defaults to true once
# GIT_PS1_SHOWDIRTYSTATE is enabled.
GIT_PS1_SHOWSTASHSTATE=true:スタッシュ ($)
[root@localhost sandbox(main)]# touch file
[root@localhost sandbox(main)]# git add file
[root@localhost sandbox(main)]# git commit -m "test"
[root@localhost sandbox(main)]# git stash
Saved working directory and index state WIP on master: c844d84 test
[root@localhost sandbox(main $)]#
上記環境変数の説明個所
# You can also see if currently something is stashed, by setting
# GIT_PS1_SHOWSTASHSTATE to a nonempty value. If something is stashed,
# then a '$' will be shown next to the branch name.
GIT_PS1_SHOWUPSTREA=<value>:アップストリームとの差分状態
<value> に "auto" を指定した例。
差分なし(=)
[root@localhost sandbox(main=)]#
遅れ(<)
// アップストリーム側のファイルなど修正した状態で
[root@localhost sandbox (main=)]# git fetch
[root@localhost sandbox (main<)]#
先行(>)
[root@localhost sandbox (main=)]# touch file
[root@localhost sandbox (main=)]# git add file
[root@localhost sandbox (main=)]# git commit -m "test"
[root@localhost sandbox (main>)]#
分岐(<>)
// ローカルが先行し、アップストリーム側のファイルなど修正した状態で
[root@localhost sandbox (main>)]# git fetch
[root@localhost sandbox (main<>)]#
上記以外の <value> としては verbose, name, legacy, git, svn がある。
上記環境変数の説明個所
# If you would like to see the difference between HEAD and its upstream,
# set GIT_PS1_SHOWUPSTREAM="auto".  A "<" indicates you are behind, ">"
# indicates you are ahead, "<>" indicates you have diverged and "="
# indicates that there is no difference. You can further control
# behaviour by setting GIT_PS1_SHOWUPSTREAM to a space-separated list
# of values:
#
#     verbose       show number of commits ahead/behind (+/-) upstream
#     name          if verbose, then also show the upstream abbrev name
#     legacy        don't use the '--count' option available in recent
#                   versions of git-rev-list
#     git           always compare HEAD to @{upstream}
#     svn           always compare HEAD to your SVN upstream
GIT_PS1_STATESEPARATOR=<value>:区切り文字
<value> に : を指定し、GIT_PS1_SHOWUNTRACKEDFILES=true を設定した例。
[root@localhost sandbox (main)]# touch file
[root@localhost sandbox (main:%)]#
なお、<value> のデフォルトは空白。
上記環境変数の説明個所
# You can change the separator between the branch name and the above
# state symbols by setting GIT_PS1_STATESEPARATOR. The default separator
# is SP.
GIT_PS1_*SPARSESTATE=true:sparse-checkout 関連
初期状態 (ここは環境変数に依存しない)
[root@localhost sandbox (main)]# git config core.sparsecheckout true
[root@localhost sandbox (main|SPARSE)]#
GIT_PS1_COMPRESSSPARSESTATE=true を設定すると ? に短縮可能。
[root@localhost sandbox (main)]# git config core.sparsecheckout true
[root@localhost sandbox (main ?)]#
GIT_PS1_OMITSPARSESTATE=true を設定すると省略可能。
[root@localhost sandbox (main)]# git config core.sparsecheckout true
[root@localhost sandbox (main)]#
上記環境変数の説明個所
# When the repository has a sparse-checkout, a notification of the form
# "|SPARSE" will be included in the prompt.  This can be shortened to a
# single '?' character by setting GIT_PS1_COMPRESSSPARSESTATE, or omitted
# by setting GIT_PS1_OMITSPARSESTATE.
GIT_PS1_DESCRIBE_STYLE=<value>:特定タグ、コミット、ブランチをチェックアウトした時の表示
<value> に branch を指定した例。デフォルトは tag。
[root@localhost sandbox (main)]# git tag v1.0.0
[root@localhost sandbox (main)]# git checkout v1.0.0
[root@localhost sandbox ((tags/v1.0.0))]
上記以外の <value> としては contains, describe がある。
上記環境変数の説明個所
# If you would like to see more information about the identity of
# commits checked out as a detached HEAD, set GIT_PS1_DESCRIBE_STYLE
# to one of these values:
#
#     contains      relative to newer annotated tag (v1.6.3.2~35)
#     branch        relative to newer tag or branch (master~4)
#     describe      relative to older annotated tag (v1.6.3.1-13-gdd42c2f)
#     tag           relative to any older tag (v1.6.3.1-13-gdd42c2f)
#     default       exactly matching tag
GIT_PS1_SHOWCOLORHINTS=true:色付きで表示
bash の場合、PROMPT_COMMAND が有効の時にのみ、この環境変数が適用される。

上記環境変数の説明個所
# If you would like a colored hint about the current dirty state, set
# GIT_PS1_SHOWCOLORHINTS to a nonempty value. The colors are based on
# the colored output of "git status -sb" and are available only when
# using __git_ps1 for PROMPT_COMMAND or precmd in Bash,
# but always available in Zsh.
参考
Ctags で Go 言語 (.go) のタグファイルを生成する方法
タイトルのとおり、Ctags で Go 言語のタグファイルを生成をする方法についてです (未調査ですが、バージョンによっては対応しているかもしれません)。
なお、Ctags についてはマニュアル ctags(1) をご参照ください。
環境情報
# uname -r
5.12.9-300.fc34.x86_64

# cat /etc/fedora-release
Fedora release 34 (Thirty Four)

# ctags --version
Exuberant Ctags 5.8, Copyright (C) 1996-2009 Darren Hiebert
  Compiled: Jan 26 2021, 00:00:00
  Addresses: <dhiebert@users.sourceforge.net>, http://ctags.sourceforge.net
  Optional compiled features: +wildcards, +regex
Ctags が Go 言語に未対応か確認
まず、Ctags が Go 言語に対応しているかどうか確認する。対応済みなら以降不要と思います (次は未対応の例)。
# ctags --list-languages | grep -i go
設定方法
未対応なら vim などで ~/.ctags にファイルを作成し次の設定を入力します。func, const, var, type に対応します。
--langdef=Go
--langmap=Go:.go
--regex-Go=/func([ \t]+\([^)]+\))?[ \t]+([a-zA-Z0-9_]+)/\2/f,func/
--regex-Go=/const[ \t]+([a-zA-Z_][a-zA-Z0-9_]+)/\1/c,const/
--regex-Go=/var[ \t]+([a-zA-Z_][a-zA-Z0-9_]+)/\1/v,var/
--regex-Go=/type[ \t]+([a-zA-Z_][a-zA-Z0-9_]+)/\1/t,type/
保存すると、以下のように設定が反映されているはずです。
# ctags --list-languages | grep -i go
Go

# ctags --list-kinds
...
Go
    f  func
    c  const
    v  var
    t  type
タグファイルの生成
何でも良いので適当に Go 言語のファイル (プロジェクト) を用意して、ctags -R でタグファイルを生成します。
# git clone https://github.com/golang/go.git
# cd go
# ctags -R
動作確認
適当に .go ファイルを開いて定義元へジャンプ出来るか試します。
# vim src/os/signal/signal.go
たとえば、次の []stopping の stopping 部分にカーソルを合わせて Ctrl + ] を実行してみます。
var handlers struct {
        sync.Mutex
        // Map a channel to the signals that should be sent to it.
        m map[chan<- os.Signal]*handler
        // Map a signal to the number of channels receiving it.
        ref [numSig]int64
        // Map channels to signals while the channel is being stopped.
        // Not a map because entries live here only very briefly.
        // We need a separate container because we need m to correspond to ref
        // at all times, and we also need to keep track of the *handler
        // value for a channel being stopped. See the Stop function.
        stopping []stopping
}
次のように定義元へジャンプできます。
type stopping struct {
        c chan<- os.Signal
        h *handler
}
余談: 設定内容の理解を深める
設定ファイル (~/.ctags) の意味は十分に理解できていないので、type の設定を削除し再び ctags -R を実行してみる (ジャンプできなくなるはず)。
  --langdef=Go
  --langmap=Go:.go
  --regex-Go=/func([ \t]+\([^)]+\))?[ \t]+([a-zA-Z0-9_]+)/\2/f,func/
  --regex-Go=/const[ \t]+([a-zA-Z_][a-zA-Z0-9_]+)/\1/c,const/
  --regex-Go=/var[ \t]+([a-zA-Z_][a-zA-Z0-9_]+)/\1/v,var/
- --regex-Go=/type[ \t]+([a-zA-Z_][a-zA-Z0-9_]+)/\1/t,type/
同じように stopping 部分にカーソルを合わせて Ctrl + ] を実行する。
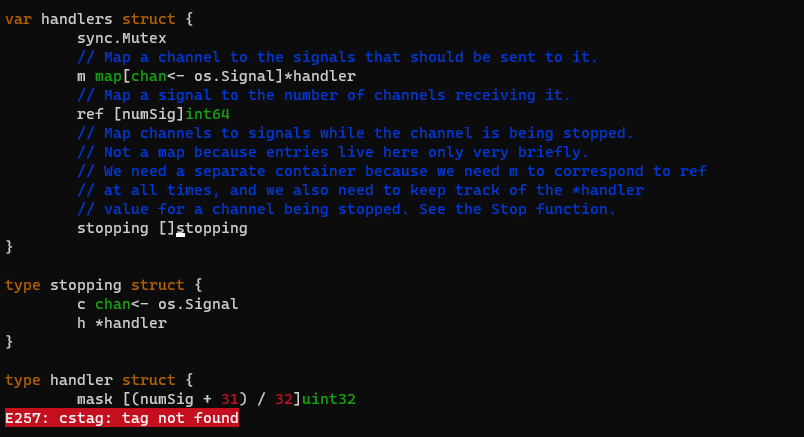
E257: cstag: tag not found でジャンプできなかった。
設定ファイルについて十分に理解できてはいないが、目的は果たせたので良しとする。 おそらく今後も使っていくと思うので、機会があれば改善していきたい。
参考
【dnf install - failed】Errors during downloading metadata for repository 'updates':...
Environment
$ cat /etc/fedora-release
Fedora release 32 (Thirty Two)

$ uname -r
5.10.16-100.fc32.x86_64

$ rpm -qa dnf
dnf-4.5.2-1.fc32.noarch
Issue
When running dnf install, it may fail with the following error message.
$ sudo dnf install bpftrace
[sudo] password for fdr:
Fedora 32 - x86_64 - Updates                                                                10 kB/s | 8.0 kB     00:00
Fedora 32 - x86_64 - Updates                                                               105 kB/s | 498 kB     00:04
Errors during downloading metadata for repository 'updates':
  - Zchunk error: Unable to find multipart download range

Error: Failed to download metadata for repo 'updates': Yum repo downloading error: Downloading error: Unable to initialize zchunk file repodata/614eafe39182738a02926010fba06db5562aae022e34f9be571c0abe0154e166-primary.xml.zck: Unable to set zchunk file descriptor for repodata/614eafe39182738a02926010fba06db5562aae022e34f9be571c0abe0154e166-primary.xml.zck: Unable to find multipart download range
Resolution (in my case)
Execute the following command.
$ sudo dnf clean all
118 files removed
Verify that the issue has been resolved.
$ sudo dnf install bpftrace
...
===========================================================================================================================
 Package                           Architecture           Version                            Repository               Size
===========================================================================================================================
Installing:
 bpftrace                          x86_64                 0.11.0-2.fc32                      updates                 1.2 M
Installing dependencies:
...
Installed:
  bcc-0.15.0-2.fc32.x86_64                 bcc-tools-0.15.0-2.fc32.x86_64          bpftrace-0.11.0-2.fc32.x86_64
  clang-10.0.1-3.fc32.x86_64               clang-devel-10.0.1-3.fc32.x86_64        clang-libs-10.0.1-3.fc32.x86_64
  clang-tools-extra-10.0.1-3.fc32.x86_64   cmake-filesystem-3.17.4-2.fc32.x86_64   compiler-rt-10.0.1-1.fc32.x86_64
  gcc-c++-10.2.1-9.fc32.x86_64             kernel-devel-5.10.22-100.fc32.x86_64    libbpf-2:0.0.7-1.fc32.x86_64
  libomp-10.0.1-2.fc32.x86_64              libomp-devel-10.0.1-2.fc32.x86_64       libstdc++-devel-10.2.1-9.fc32.x86_64
  python3-bcc-0.15.0-2.fc32.noarch         python3-netaddr-0.7.19-21.fc32.noarch

Complete!
What if the issue still persists?
The following links may be helpful.
Windows10 上の VScode から SSH 接続可能な Linux 環境上のファイルを編集できるようにする方法
タイトルのとおりメモ。
振る舞いとしては接続先環境で VScode を開いているのと同じようなものなので、 接続先環境のファイルを編集できるだけではなく、VScode 内のターミナルも接続先仕様となる。
環境情報
接続元 (Windows10)
# OS
C:\Users\local>ver

Microsoft Windows [Version 10.0.19042.804]

# ssh
C:\Users\local>ssh -V
OpenSSH_for_Windows_7.7p1, LibreSSL 2.6.5

# VScode
C:\Users\local>code -v
1.53.2
622cb03f7e070a9670c94bae1a45d78d7181fbd4
x64

# VScode extension (remote 関連)
C:\Users\local>code --list-extensions --show-versions
...
ms-vscode-remote.remote-containers@0.158.0
ms-vscode-remote.remote-ssh@0.64.0
ms-vscode-remote.remote-ssh-edit@0.64.0
ms-vscode-remote.remote-wsl@0.53.4
ms-vscode-remote.vscode-remote-extensionpack@0.20.0
...
接続先 (Linux: Fedora32)
# OS
[fedora@localhost ~]$ cat /etc/fedora-release
Fedora release 32 (Thirty Two)

# sshd
[fedora@localhost ~]$ rpm -qf $(which sshd)
openssh-server-8.3p1-3.fc32.x86_64
設定手順
以降、全て接続元の環境で行います。
1. 拡張機能のインストール
- VScode を開く
- Remote Development をインストールする
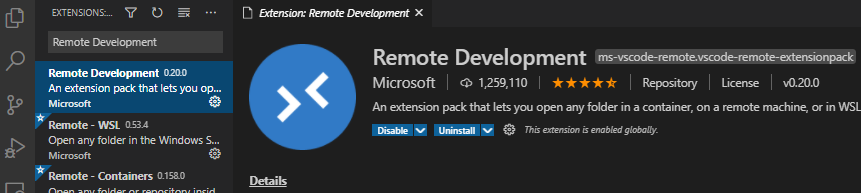
コマンドラインでインストールできるかやってみた。深い意味はない。
試した環境は Linux だがコマンドは同じなので、windows でも同様にできると考える。 以下は、余談: コマンドラインでインストール
[fedora@localhost ~]$ code -h
...
[fedora@localhost ~]$ code --install-extension ms-vscode-remote.vscode-remote-extensionpack
Installing extensions...
Installing extension 'ms-vscode-remote.vscode-remote-extensionpack' v0.20.0...
(node:272541) [DEP0005] DeprecationWarning: Buffer() is deprecated due to security and usability issues. Please use the Buffer.alloc(), Buffer.allocUnsafe(), or Buffer.from() methods instead.
Extension 'ms-vscode-remote.vscode-remote-extensionpack' v0.20.0 was successfully installed.
code --list-extensions --show-versions の差分 (インストール前後) abusaidm.html-snippets@0.2.1
auchenberg.vscode-browser-preview@0.7.0
golang.go@0.22.1
+ ms-vscode-remote.remote-containers@0.158.0
+ ms-vscode-remote.remote-ssh@0.64.0
+ ms-vscode-remote.remote-ssh-edit@0.64.0
+ ms-vscode-remote.remote-wsl@0.53.4
+ ms-vscode-remote.vscode-remote-extensionpack@0.20.0
oderwat.indent-rainbow@7.5.0
rust-lang.rust@0.7.8
syler.sass-indented@1.8.16
vadimcn.vscode-lldb@1.6.1
vscode-icons-team.vscode-icons@11.1.0
2. ssh コンフィグ設定
- ~.ssh/config がないなら作成する
- config を次のように定義する <> 内は環境ごとに異なる値
C:\Users\local\.ssh>type config
Host <任意の名前: 例) Fedora32>
    HostName <接続先ホスト名(IPアドレス)>
    User <接続先ユーザ名>
試す
- 接続元環境で VScode を開く
- Ctrl + Shift + P -> 「connect to host」と入力

- config で設定した Host 名が表示されるので選択、押下。
(あるいは VScode 上の左アイコン「Remote Explorer -> Host 名 -> Connect to Host in New Window」 から)
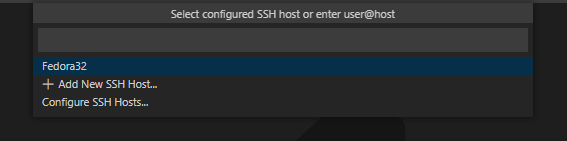
- 新しい VScode が立ち上がり、パスワード入力を求められるので入力する
- 接続先で VScode を開いているかのような感覚で操作が可能となる。
次の画像は、接続先 (SSH:Fedora32) の / (ルート) を開いている例。
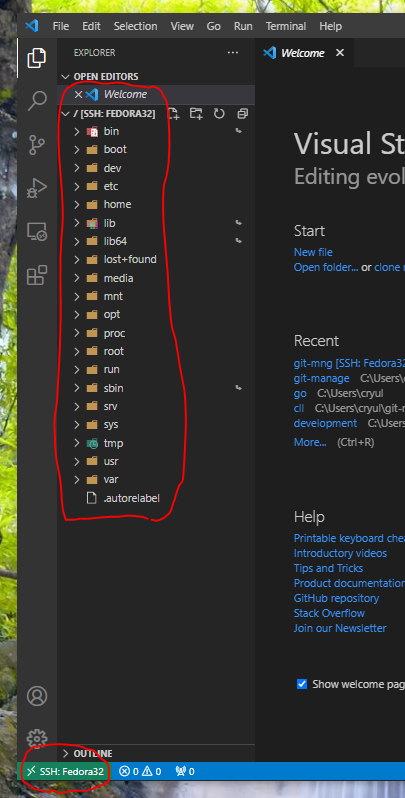
Linux 仮想マシンの Hypervisor を手っ取り早く確認する方法
今まで Linux 仮想マシンの Hypervisor を確認する (Hypervisor を使っているかどうかの確認) 方法として、dmidecode コマンドを使っていたが、より簡単に確認する方法を知ったのでメモ。
手順
次のように仮想マシン上で dmesg | grep 'Hypervisor detected' を実行するだけ。
# dmesg | grep 'Hypervisor detected'
[    0.000000] Hypervisor detected: Xen HVM
なお、dmidecode では次のように表示される。
# dmidecode
...
Handle 0x0100, DMI type 1, 27 bytes
System Information
        Manufacturer: Xen ★
        Product Name: HVM domU
        Version: 4.2.amazon
...
KVM の表示例
比較のため、KVM の例も記載する。
# dmesg | grep 'Hypervisor detected'
[    0.000000] Hypervisor detected: KVM
dmidecode では次のように表示される。
# dmidecode
...
Handle 0x0100, DMI type 1, 27 bytes
System Information
        Manufacturer: QEMU ★
        Product Name: Standard PC (Q35 + ICH9, 2009)
        Version: pc-q35-4.2
...
物理環境の表示例
同様に物理環境の例も記載する。
# dmesg | grep 'Hypervisor detected'
(何も表示されない)
dmidecode では次のように表示される。
# dmidecode
...
Handle 0x000C, DMI type 1, 27 bytes
System Information
    Manufacturer: Apple Inc. ★
    Product Name: Macmini7,1
    Version: 1.0
...
おまけ
Hypervisor detected: がどこのカーネル関数でで出力されるのか気になったので、調べた。
これは、detect_hypervisor_vendor() 関数で出力していると判明。何をしていかなど詳細は未調査。
linux/hypervisor.c at v5.9 · torvalds/linux · GitHub
 29 static const __initconst struct hypervisor_x86 * const hypervisors[] =
 30 {
 31 #ifdef CONFIG_XEN_PV
 32         &x86_hyper_xen_pv,
 33 #endif
 34 #ifdef CONFIG_XEN_PVHVM
 35         &x86_hyper_xen_hvm,
 36 #endif
 37         &x86_hyper_vmware,
 38         &x86_hyper_ms_hyperv,
 39 #ifdef CONFIG_KVM_GUEST
 40         &x86_hyper_kvm,
 41 #endif
 42 #ifdef CONFIG_JAILHOUSE_GUEST
 43         &x86_hyper_jailhouse,
 44 #endif
 45 #ifdef CONFIG_ACRN_GUEST
 46         &x86_hyper_acrn,
 47 #endif
 48 };
...
 53 bool __initdata nopv;
 54 static __init int parse_nopv(char *arg)
 55 {
 56         nopv = true;
 57         return 0;
 58 }
 59 early_param("nopv", parse_nopv);
...
 61 static inline const struct hypervisor_x86 * __init
 62 detect_hypervisor_vendor(void)
 63 {
 64         const struct hypervisor_x86 *h = NULL, * const *p;
 65         uint32_t pri, max_pri = 0;
 66
 67         for (p = hypervisors; p < hypervisors + ARRAY_SIZE(hypervisors); p++) {
 68                 if (unlikely(nopv) && !(*p)->ignore_nopv)
 69                         continue;
 70
 71                 pri = (*p)->detect();
 72                 if (pri > max_pri) {
 73                         max_pri = pri;
 74                         h = *p;
 75                 }
 76         }
 77
 78         if (h)
 79                 pr_info("Hypervisor detected: %s\n", h->name); ★
 80
 81         return h;
 82 }
なお、detect_hypervisor_vendor() は、init_hypervisor_platform() から呼び出されている。
 95 void __init init_hypervisor_platform(void)
 96 {
 97         const struct hypervisor_x86 *h;
 98
 99         h = detect_hypervisor_vendor();
100
101         if (!h)
102                 return;
103
104         copy_array(&h->init, &x86_init.hyper, sizeof(h->init));
105         copy_array(&h->runtime, &x86_platform.hyper, sizeof(h->runtime));
106
107         x86_hyper_type = h->type;
108         x86_init.hyper.init_platform();
109 }
参考
任意の Linux コマンドに紐づく debuginfo パッケージを確認する方法
本記事は、次の記事との関連になります。
【RHEL, CentOS, Fedora】Linux コマンドのデバッグ方法 - AWESOME LINUX WORLD
この記事で紹介されているよりも簡単に、コマンドの debuginfo パッケージを確認する方法がありました。 別記事の調査中 (執筆中) に発見しましたが、せっかくなのでメモがてら記事にしました。
手順
gdb で任意のコマンドをデバッグします (ここでは free コマンド)。
$ gdb -q free
Reading symbols from free...
Reading symbols from .gnu_debugdata for /usr/bin/free...
(No debugging symbols found in .gnu_debugdata for /usr/bin/free)
Missing separate debuginfos, use: dnf debuginfo-install procps-ng-3.3.15-7.fc32.x86_64

(gdb)
gdb で ls コマンドのデバッグを試みますが、デバッグ情報が無いので、
$ dnf debuginfo-install procps-ng-3.3.15-7.fc32.x86_64 を実行しろというようなことを言われています。
このように debuginfo パッケージ名 (と実行コマンド) を確認できます。便利ですね。
備考
調査環境は次のとおりです。
$ cat /etc/redhat-release
Fedora release 32 (Thirty Two)

$ uname -r
5.6.19-300.fc32.x86_64

$ gdb -version
GNU gdb (GDB) Fedora 9.1-5.fc32
...
